Introducing Windows Fax and Scan
Windows
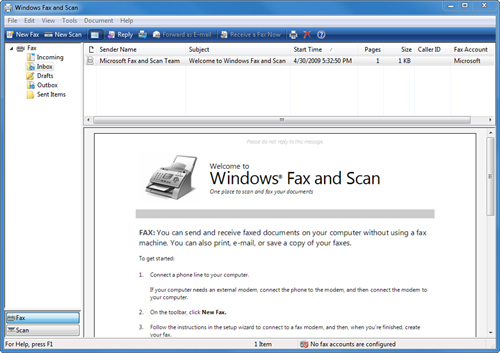
Fax and Scan lets you fax and scan documents with a single application,
rather than using the combination of Fax Console and the Scanner and
Camera Wizard that you had to use in Windows XP. You can see the
application in Figure 1.
Note
Windows
Fax and Scan is available on all versions of Windows 7. (This is a big
improvement over Vista, where it was provided only with the Business,
Enterprise, and Ultimate editions.) If you don’t see Windows Fax and
Scan in your Start menu, go to the Control Panel, select Programs, and
select Turn Windows Features On and Off. You should be able to enable it
there. |
Windows Fax and Scan uses the following hardware:
You don’t need to have both a
scanner and a fax modem to take advantage of Windows Fax and Scan. The
program does help you use both together, but it can be useful even if
you have just one or the other.
Note
If your computer has a dial-up (analog) modem, the modem probably includes fax capabilities. If
your computer doesn’t have a modem, you can easily install an
inexpensive internal or USB external fax modem. If you have
Internet-based telephone service, contact your phone service provider to
see whether your line can carry fax signals. In a corporate setting,
check to see whether your organization uses digital telephone wiring
before you try to hook up a dial-up modem. Digital phone lines can
damage your modem. |
The
scanner and fax modem can be integrated into an all-in-one unit (print,
scan, copy, fax), or you can use separate components. If you have a fax
server or a multifunction device on your network, you can also use it
with Windows Fax and Scan.
Note
Windows
Fax and Scan is designed primarily to make it easy to scan, store, and
fax documents. Although you certainly can use it to scan pictures, if
your primary goal is to scan your photograph library, you’re better off
using the Windows Photo Gallery tool. |
Preparations for Using Windows Fax and Scan
If your scanner or fax
device is not already installed, follow the manufacturer’s
recommendations to install the fax or scanner hardware before you use
Windows Fax and Scan. If you need to install a dial-up modem, you can
use the Add a Device applet in Control Panel to install most serial
modems or USB modems that don’t include special drivers. If your modem
or scanner includes a disk with Windows 7 or Vista drivers, install them
as directed. Windows XP drivers may be used with some devices if
Windows 7 or Vista drivers are not provided by the vendor.
If
you are given a choice between installing TWAIN or WIA drivers for your
scanner, install WIA (Windows Imaging Architecture) drivers for use
with Windows Fax and Scan. This is something to be especially careful of
if you have a scanner that came with Windows XP drivers but not Windows
7 or Vista drivers. TWAIN drivers may support more advanced scanner
features, such as transparency adapters or dust and scratch removal,
found on some models, but they are not compatible with Windows Fax and
Scan. Some scanner driver installations install both types of drivers.
Note
If you have an all-in-one device, it most likely will not
be seen as a fax device by Window Fax and Scan. The Faxing part of Fax
and Scan works only with fax modems and Microsoft-compatible network fax
servers. To send faxes through your all-in-one device, just select it
as a printer. The device should be able to scan through Windows Fax and Scan. |
Note
You
can often get by just plugging in the device and letting Windows find
it, but you really should read the manufacturer’s installation
instructions. In some cases it’s necessary to install the supplied
software before installing the device for the first time. If you do
things out of order and run into trouble, install the software, then go
to the Device Manager, find the incorrectly installed device, delete it,
and then restart Windows. If
Windows detects your modem but can’t find a driver for it, you’ll need
to download one from the manufacturer’s website. Your PC manufacturer
also might be able to supply a driver. |
Configuring the Fax Service
To set up your system to
send and receive faxes with a fax modem, click Start, All Programs,
Windows Fax and Scan. Make sure Fax view is selected: click Fax at the
bottom of the left pane. Next, click the New Fax button on the toolbar.
The Fax Setup dialog box appears. The first time you do this, Windows
will walk you through the process of setting up the faxing software.
Select Connect to a Fax
Modem. On the next screen, enter a name for the modem or keep the
default name, Fax Modem. Click Next to continue.
Configuring Fax-Receiving Options
On the next screen, choose how you wish to receive faxes. Your options include the following:
Answer Automatically—
Choose this option if you have a dedicated fax line or a single phone
line with a distinctive ring detection switch that automatically routes
different types of calls to different devices. The fax modem will pick
up every incoming call, so don’t make this selection if your computer
shares your personal phone line.
Note
You
might see a Windows Security Alert indicating that Windows Firewall is
blocking Windows Fax and Scan from receiving incoming network
connections. If you get this prompt, click Unblock. In most cases, you
should leave Private Networks checked and leave Public Networks
unchecked. |
Notify Me—
Choose this option if you have a single phone line but don’t have a
distinctive ring detection switch. Windows will pop up a notification
when the phone line rings, and you’ll opt whether to answer it and
receive the incoming fax.
I’ll Choose Later— Choose this option if you want to create a fax right away and prefer to delay setting up receiving faxes until later.
A New Fax dialog box appears. If you don’t want to send a fax now, close it.
Setting Up Sender Information
Click Tools,
Sender Information to set up the information you want to place on your
cover pages and in the top margin of outgoing faxes. You can complete as
much or as little (even none) of the dialog box as desired.
Creating a Customized Cover Page
To create a customized cover page, click Tools, Cover Pages. Existing personalized cover pages (if any) are listed. Then,
To create a new cover page from scratch, click New.
To
customize one of the standard cover pages that are provided by
Microsoft, click Copy, select a cover page template, and select Open.
Then, highlight the copied entry and click Rename. Give it a new name,
but be sure that the name still ends with .cov. Press Enter, and then click Open to personalize the cover page.
To modify one of your existing cover pages, select it and click Open.
In each case, this opens the Fax Cover Page Editor, shown in Figure 2.

Tip
When
you insert a field name and associated field, they’re selected as a
group and they will move as a group. If you want to move one of the
components separately, click somewhere in the cover page away from any
items. Then, move the desired items. To
move several items at once, hold the Shift key down and click on each
of them, and then drag them. You can also click the Select icon
(leftmost on the toolbar) and drag a box around the items you want to
move. |
Use the Insert menu to
place fields and field names as desired, along with simple shapes. Use
the Format menu to align objects, adjust spacing, center the page, or
change the order of overlapping objects. Use the View menu to show or
hide menus and grid lines (grid lines are hidden by default, but can be
useful in aligning design elements). Use the File menu to print or save
your cover page. Cover pages are saved with the .cov file extension and are saved in your Personal CoverPages folder by default.
To make your personalized cover page available to all users, you must copy the cover page file to \ProgramData\Microsoft\Windows NT\MSFax\Common CoverPages\xx-xx, where xx-xx is a code that specifies your geographic region and language. Moving the file to there is a bit tricky. Follow these steps:
1. | Create
a cover page, and save the cover page file in the default location
(your Personal CoverPages folder). Test it by sending it in a fax, to be
sure that it looks the way you want it to. After you’re sure that it’s
correct, proceed to the next step.
|
2. | Click Start, Documents. Dig into Fax, then Personal CoverPages. Locate the cover page file, right-click it, and select Cut.
|
3. | Browse to folder \ProgramData\Microsoft\Windows NT\MSFax\Common Coverpages. The uppermost folder, ProgramData, is usually hidden, so you will have to type \ProgramData
into the Explorer window’s address bar (just type it in where the
breadcrumb path list is). Then double-click Microsoft, Windows NT,
MSFax. Windows will say you don’t have permission to view MSFax. Click
Continue to grant yourself permission, and continue to Common
Coverpages, and then into the regional folder, which is en-US for U.S. English but might be different on your computer.
|
4. | Right-click
in the folder’s contents pane and select Paste. You will have to go
through a User Account Control prompt to get permission to paste the
file into this folder.
|
The cover page will now be available to all users on your computer.
Configuring Fax Settings
To
configure your computer’s fax settings, click Tools, Fax Settings. If
prompted by UAC, click Continue if you are an administrator, or provide
an administrator password if you are a standard user. A multitabbed Fax
Settings dialog box appears.
1. | Select the General tab (see Figure 3) to specify whether the fax service should send, receive, or send and receive faxes and how to answer incoming calls.

|
2. | Click
More Options. In the TSID and CSID boxes, enter your fax number and/or
company name. This information will be displayed on the other person’s
fax machine when you send or receive a fax.
If you want incoming faxes to be printed automatically, check
Print a Copy To and select a printer from the drop-down list.
Click OK to save the information.
|
3. | Click
the Tracking tab to adjust how to be notified about the status of a
sent or received fax. By default, all notifications (which appear as
pop-up balloon notes), fax monitor settings, and sound options are
enabled. Clear check boxes to disable selected notifications.
|
4. | Click
the Advanced tab to view or move the location of the Fax Archive
folder, disable the banner line at the top of sent faxes, adjust
redialing settings, and specify when discount long-distance rates start
and end.
|
5. | Click
the Security tab to specify which users and groups can send faxes or
manage the fax service and fax documents. By default, everyone can use
the fax service. If you want to restrict its use, remove Everyone and
add individual users.
|
6. | Click Apply; then click OK to save your changes and close the Fax Settings dialog box.
|
7. | Click Tools, Fax Accounts if you need to add or remove a fax modem or network fax server.
|
8. | Click
Tools, Options to bring up a multitabbed Fax Options dialog box. The
General tab is used to enable (default) or disable playing a sound when
new messages arrive. Click the Receipts tab to configure the sending of
email delivery receipts (which can also include a copy of the sent fax).
Click the Send tab if you want to enable the inclusion of an original
message in a reply. Click Compose to change the default font used for
faxes (10-pt. Arial Regular).
Tip If
you regularly send faxes to conventional fax machines (which usually
have resolution of no more than 200dpi), a 10-pt. font is a little too
small for easy reading. We recommend 12-pt. Arial instead. |
|